Saturday, October 29, 2011

Flynn Rider costume is done, but no photos yet!

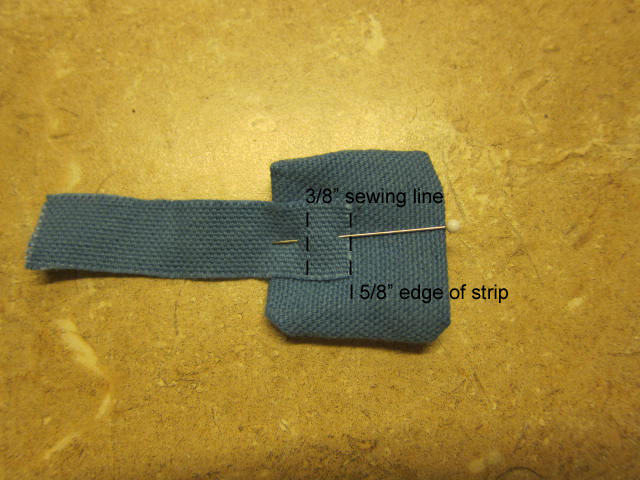
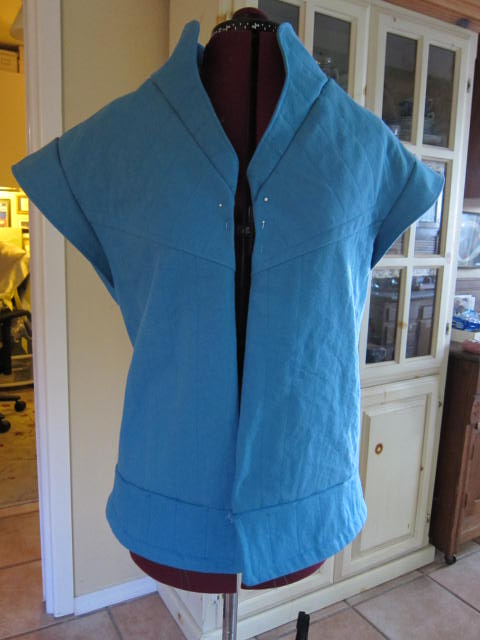
As I posted yesterday, the costume is done! Hopefully, I'll have photos before the weekend is over. Additionally I made a Sweeney Todd vest and scarf today and recovered a corset in black for Mrs. Lovett. Also no photos there yet. Lol. There's more to do for Eurydice  and a little shopping for The Children's Hour but I estimate by Tuesday my hands and shoulders can take a rest.

In doing so much sewing I think sewing machine cabinets and maybe sewing machines should be designed differently. There is too much turning of the right shoulder or arm, stressing the muscles in the back.  There should be more room on the platform for material and hand space. Just my observations.

My wonderful husband did all of the Halloween decorations while I've been madly sewing. The house looks great. Thank you!

Friday, October 28, 2011

Flynn Rider- fastners, clasps, latches, hooks or loops

What ever you want to call them the metal loops and hooks on the front of the doublet were an interesting detail. It wasn't enough for the designers to simply make closures they had to add rivets, patches and seaming. After having completed this part if I do the costume again I'd do the patches differently. There was a lot of fabric to sew through, in some places 7 layers.

Right tab with studs placed
Hook through the fabric but not the tab

Loop tab on square patch

Back of hook on inside of doublet
Assembly completed (weird color)
The small rivets in the patches are actually studs like those in a bedazzler. For the loop patch three sides were sewn, the flat piece was sewn to the patch, the loop was placed on the patch and using a zipper foot the strip was brought over the flat portion of the loop and sewn.  Next the open end of the patch and the strip were tucked inside the patch and sewn to the doublet. The studs were put on next. Because of the thickness a bit of glue would be a good idea, something that bonds metal to fabric like E6000 (use sparingly). If I did this again I'd probably not double the patch, just turn under the edges and top stitch, no need for glue in that case. For the hook side the hook needed to be put through a small hole in the fabric and then secured to the doublet. The stitching should be under the patch if you made the hook and it's extension correctly (mine turned out to be backwards! sorry hubby) The patch also needs a hole in it for the hook to go through. Then just like the other side sew top stitching with a zipper foot and add the studs. Because my hooks were backwards under the patch I could not top stitch on the end of the patch.

By a stroke of luck I found washable Irish linen pants I redid for the pants. It ended up with an elastic waistband but I still have the other fabric if I want to make a new pair of pants. Time was running out and it seemed like a wise thing to go with the thrift store find.

Next post will be the boots enhancements.

As a teaser, the outfit is actually done, but my son took it for a pre-Halloween party so I don't have photos yet! 

Thursday, October 20, 2011

Flynn Rider starting to take shape

It's beginning to actually look like something! (No it's not uneven, the dress form is too small!) For the shirt I took off the regular collar, made one using the old collar for the neck curve and the top edge with squared corners. It is interfaced.  I've decided to buy boots, just getting too close to the deadline with too much to do. Here's a link Boots . They are reasonably cheap, they do not look exactly like Flynn's but I think I can adapt the tops and will make the ankle covers.

Thursday, October 13, 2011

Flynn Rider costumes on-line, just in case you want to pay for a costume

The other 2 projects, costuming for Eurydice  and The Children's Hour have started to take time away from the Flynn Rider costume. I am working on bits and pieces and will post photos once there is something to really see.

To make the front meet correctly I had to fold in some of the overlay and the first try resulted in an uneven fold where the lapel makes an angle up to the collar. This wouldn't have taken long to correct except my son is only here once or twice a week. It now looks better and I'm working on the tabs. I also did a sample rivet and the posts might be too long. A bit of research shows the rivets are really for leather and it would be better to use round head spots for the shoulders. The front tabs might be thick enough for a rivet.

Thrift store shopping turned up a great plain leather belt, however it looks like it's too wide for the waist belt (why does he wear this anyway? It doesn't hold anything up and nothing is attached to it) and will more likely be the pouch belt.  We're not sure we'll do the satchel.

Hang in there! More photos soon!

Late edit: Just looked on-line at the Flynn Rider costumes and almost choked at either the price or the way they looked. Can't imagine what I'd charge for mine.
etsy $600.00 costume     etsy $325.00 costume      cosplay $166.00 costume
 

Monday, October 10, 2011

Flynn Rider "forged" clasps

The clasps on the front of the doublet were a worry from the start. They are very unique. I've looked at oval hoops and thought maybe I could flatten one end, but the fasteners really aren't ovals.
clasps 
There's a tutorial on making the fasteners at Flynn Rider closures tutorial . They use # 8 wire and lots of muscle!
I didn't have 8 gauge wire and their wire more round than I wanted. I did use their technique for shaping the hooks though. I had copper wire I was going to use for an open bustle (another project I bought the materials for but haven't begun!). Bending the wire was too much for me so I turned to my husband. He was able to make a much better replica.
What you see to the right is the wire and the loops, they were flattened by pounding with a hammer after they were formed. We tried to flatten the wire and then shape but that didn't work.

In the photo the small blue square of fabric is the size of the completed patch the loop is sewn on, it measures 1 1/4" by 1 3/8" (sort of). The patch with the strip pinned to it is the unsewn size, folded (basically I added about 1/4 inch for the seams) and the strip is what keeps the metal loops attached. The strips are so narrow I didn't want to make tubes. Instead I cut the actual size of the strips (3/4" wide by 2 1/2") and used Fray Check on the edges.

For the other side, the hook side, the patches are longer, they actually overlap the center. This piece is 1 5/8" by 1 1/2". To make either patch cut on them on the fold sew the two side edges, turn, tuck in the raw edges. On the loop side the thin strip will be tucked in as well.

To sew the loop side, after turning and tucking, place 1/2" of the strip on to the small rectangle , sew through all layers 3/8" in. Sew a couple of times to secure.
Ideally the patch should be more squared all the way around than the photo to the left.
Pin the patch to the vest so it just to the left of the vest edge.
Next sew the patch to the vest on three sides, top, left and bottom. Lay the flat end of the loop on to the strip, fold the strip over the end of the loop. Using a zipper foot sew the strip close to the metal loop. Sew twice to secure. Tuck the strip into the open but inward folded edge and finish sewing down the right hand side of the patch.

Saturday, October 8, 2011

Flynn Rider Doublet construction Done!

The construction of the doublet is done! Next comes the embellishments and front closures. (This mannequin is way too small for the costume.)
Flynn's doublet awaiting adornment

Thursday, October 6, 2011

Flynn Rider Studs

Detail of collar
Rivets/Studs

Our local craft store, Michael's, had a package of brass "rapid rivets" by Tandy Leather Factory. You can also get them at leather stores if there's one in your area. They're in assorted sized and there are just enough for the around the armholes. My doublet will use 8 on each side, but it could use 9 or 10 if you went all the way under the arm.

The photo on the right is a detail of the back of the collar, you can see the extra long piece that will be tucked under for a clean edge. If you do a long collar facing take into account the top stitching. You don't want to sew the top stitching all the way down to the edge on the back facing, stop 5/8 before the edge (the seam depth).
The top stitching sort of matches the lines on the doublet overlay. Two different views of the Flynn Rider drawing show two different match ups. I chose to go with the one that is not an exact continuation of the lines to make it easier to assemble.
The lines are farther apart in the view on the left, but in other views they seem on line with the doublet's.
Imagineers don't have to always get perfect every time. ;-)


Wednesday, October 5, 2011

Flynn Rider Costume continues

The front lapel/collar is top stitched both along the edges and vertically. The vertical lines and top edge can be done before attaching the piece but obviously the lower part is done after it's sewn to the main body.
close up of lapel/collar top stitching
I chose to leave the inside back facing free from the seam and turn it under for a more finished look, possibly less irritating on the neck too.

In my quest for a leather bag I found a leather rectangular pouch that I think will work. It needs the belt loop, I'll post before and after photos soon.

My biggest concern now is finding the studs for the armhole seams and finding boots. I doubt we'll spend the money for real boots, so I'll have to make suitable covers, plus the spat-like additions.

Sunday, October 2, 2011

Top stitching Flynn Rider costume

Top stitching seems to be everywhere on Flynn Rider's vest!
Top stitching simulates the strips of leather used to make the vest/doublet. It is the top stitching that gives the costume it's authentic look...unless of course you're making it out of leather. 

 Having shown the caplet top stitching in the last post, let's turn to the piece below the main body of the vest aka peplum.  Two, long, slightly curved pieces are sewn at the center back and lined with the same fabric to make the peplum. I used the original pattern but shortened the vertical length. Note: Do not cut out this piece until after you've lengthen the top of the vest. (See previous post on Sept 19th showing the pattern pieces.) Turn it inside out, pin to keep the seam flat. Close examination of the Tangled pictures shows the top front edge goes from narrow to wide and then again narrows and widens as the stitching goes to the center back. This is repeated on the other side so the widest margin of top stitching is at the center back. See close-up of photo to the left for the front edge of the peplum.
Next there are rows running vertically down the peplum. To add a bit of a flared look I made the top of the rows about 1.5 inches apart and the bottoms are 1.75 apart. Start at the center back and mark the lines working forward, adjust the angles if they seem to be too slanted. Most of the peplum will be covered by belts and bags.


Caplet Issues: (Sew shoulder seams prior to this.)
The photo to the right shows the caplet set in the sleeve hole. There was nothing special about this other than making sure you like the depth at the top of the sleeve cap. Personally, I think this is one of the times you need to make sure you like the look of the vest on the wearer. Use the Flynn Rider pictures to judge for yourself how far out the caplet edge should be.
If I had more fabric I'd re cut the caplet and make it longer. As it is, it does not go all the way around the armhole. The photo to the left shows the area where the ends do not meet.  I'll make a facing to finish off the armhole but with out a complete circle you'll need to make sure you like the look of the caplet's arrangement. My main concern was for the front to look like the Tangled picture and have the top stitching meet low in the armscye in the front, this gives the illusion it goes all the way around.

Once the caplet was in I could figure out how far apart the studs will be, about 3", but with some minor adjustments to match placement on the original costume.